MasterBoy lets you recolor Game Boy games - here's how
Written on January 6th, 2022 by Pierre L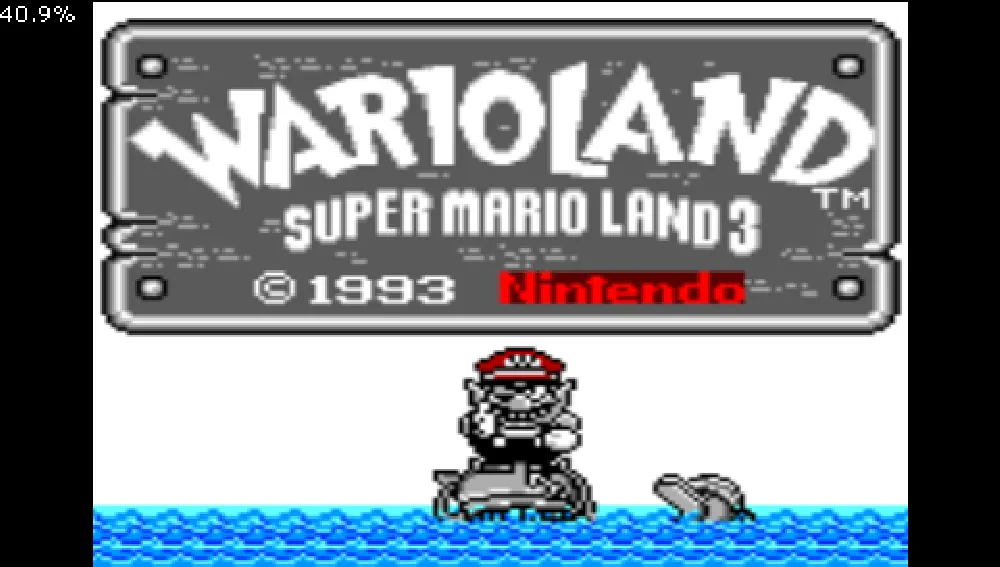
MasterBoy is one of the best Game Boy emulators for PSP. And it lets you recolor Game Boy games - one tile at the time.
This is obviously not the recommended way to play Game Boy games in color in 2022.
I’m writing about this feature because it’s pretty impressive for an emulator for a portable device from 2007, and because I never saw mention of it before.
The creator of MasterBoy has written a 25-page guide to explain the recoloring feature.
That probably didn’t help - the guide makes the process seem more daunting than it already is, and even the short-and-sweet explanation below is still pretty complicated.
The recoloring works through specially crafted scripts, which will only work with MasterBoy on PSP. I’m sure better ways to color ROMs have been invented since this emulator was released 15 years ago.
But if someone still wants to try it out, here’s how it’s done.
Step 1
Create an .ini file with the same name as your ROM, plus the region code.
So for the ROM Wario Land.gb from a PAL region, the ini is named Wario Land.pal.ini.
Save the .ini into the same folder as the ROM.
Step 2
Paste the following into the .ini:
Init:
ColorIt.addTileCrc 176, 191
ColorIt.autoShowVramCrc = true
[Default]:
ColorIt.setPalette 0, rgb(255,255,255), rgb(168,168,168), rgb(88,88,88), rgb(0,0,0)
ColorIt.addTileRule 0, 383, 0
End
This way, MasterBoy will show the VRAM address of the tiles every time they are loaded.
For instance, the VRAM address of the tile screen of Wario Land is 7d0f0982:

The [Default] section simply tells the emulator to paint the game in shades of gray. Otherwise, the entire screen will remain pitch black.
Step 3
Let’s add some color to the tiles.
We define a tile of 4 RGB colors for the title screen tiles:
[7d0f0982]:
ColorIt.setPalette 1, rgb(255,0,0), rgb(168,0,0), rgb(88,0,0), rgb(0,0,0)
The first three of the colors are shades of red, the last (0,0,0) is black.
Step 4
This is where it gets tricky.
To identify the tiles, the developer of MasterBoy suggests using VisualBoyAdvance - which was pretty old even then.
Luckily, it seems to still work under Windows 10.
After downloading VBA and loading the ROM, we head for Tools -> Tile Viewer.
Here we can see that Wario’s hat spans tiles 1 to 3 in the title screen:

Step 5
Going back to the .ini script, we add the following under the ColorIt.setPalette line:
ColorIt.addTileRule 1, 3, 1
This will tell MasterBoy to apply to tiles 1 to 3 the colors we specified in palette 1.
At this point, the resulting script will look something like this:
Init:
ColorIt.addTileCrc 176, 191
ColorIt.autoShowVramCrc = true
[Default]:
ColorIt.setPalette 0, rgb(255,255,255), rgb(168,168,168), rgb(88,88,88), rgb(0,0,0)
ColorIt.addTileRule 0, 383, 0
End

[7d0f0982]:
ColorIt.setPalette 1, rgb(255,0,0), rgb(168,0,0), rgb(88,0,0), rgb(0,0,0)
ColorIt.addTileRule 1, 3, 1
End
Result
So what did we achieve so far? Frankly, not a lot. Wario’s hat is now red, but only if he’s looking sideways.

The tiles for Wario’s forward-facing hat have a completely different address. If we want the coloring to stay consistent, they will need to be added as well.
Worse, the changes only apply to the title screen.
If we want Wario’s hat to remain red throughout the game, we will have to add a new section for every time the VRAM changes - which is fairly often.
This is as far as I went. The script below also includes comments from the developer of MasterBoy, grabbed from the full guide.
#Initialization
Init:
#The tiles we rely on for CRC
ColorIt.addTileCrc 176, 191
#For debugging
ColorIt.autoShowVramCrc = true
#Fall down here to set the default profile upon initialization
[Default]:
#Create a gray palette
ColorIt.setPalette 0, rgb(255,255,255), rgb(168,168,168), rgb(88,88,88), rgb(0,0,0)
#By default, we use the standard gray palette for everything
ColorIt.addTileRule 0, 383, 0
End
#Title screen
[7d0f0982]:
#Create some palette
ColorIt.setPalette 1, rgb(255,0,0), rgb(168,0,0), rgb(88,0,0), rgb(0,0,0)
#Color some tiles with it
ColorIt.addTileRule 128, 131, 1
ColorIt.addTileRule 200, 202, 1
ColorIt.addTileRule +0, +3, 1
ColorIt.addTileRule 1, 3, 1
ColorIt.addTileRule +252, +253, 1
ColorIt.setPalette 2, rgb(100,255,255), rgb(0,150,255), rgb(0,40,255), rgb(100,255,255)
ColorIt.addTileRule 215, 223, 2
ColorIt.addTileRule 146, 147, 2
ColorIt.addTileRule 162, 163, 2
End
#Course no. 1
[da4aa25c]:
#Palette n° 1 : blocks
ColorIt.setPalette 1, rgb(192,192,224), rgb(128,128,192), rgb(64,64,160), rgb(0,0,128)
#Associate the palette to blocks
ColorIt.addTileRule +128, +131, 1
#The tiles 136 - 139 represent a fissured block, therefore the same colors => same palette (but we could have made them different by giving them an own palette)
ColorIt.addTileRule +136, +139, 1
#Palette n° 2 : Wario
ColorIt.setPalette 2, rgb(255,255,255), rgb(255,224,128), rgb(128,112,64), rgb(0,0,0)
#Associated to tiles from Wario
ColorIt.addTileRule 0, 143, 2
#Do not forget the End to terminate
End